Monday, November 30, 2009
Happy Stacker Ring Toy
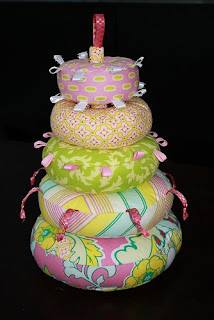
I've started making the Happy Stacker Ring Toy for Steph's baby and I just wanted to share some pics of Happy Stackers made by others. These are all so cute, but the last one is my fav.


Tuesday, November 24, 2009
Amy Butler's Little Stitches
Has anyone done any projects from Amy Butler's book, Little Stitches? If so, I would love to see pics or read your comments. Thanks!
All Things Baby
I just found out that my friend is having a baby girl. She is due in April. Also, my sister in law is pregnant with my ninth niece or nephew (that's right, I said NINTH). Also, I have a couple of friends who have had babies in the last year or so. So, I am going to be working on some baby things for a while.
 I am going to wait until I know the sex of my niece or nephew before starting a project for him or her, but I will likely make another baby quilt. I am so excited. I cannot wait to find out.
 So, keeping checking back. I will be posting pictures of the finished products and reviews of the patterns I use.
Last night I started making the happy stacker ring toy below for my friend Steph's baby. Steph chose the fabric on the right. I think it is going to turn out to be really cute.


I am planning on making a log cabin style quilt for my friend's baby that is due in April. I chose the fabric below to make up the center pieces of each block. I will use other coordinating fabrics to make up the rest of each block.
I am going to wait until I know the sex of my niece or nephew before starting a project for him or her, but I will likely make another baby quilt. I am so excited. I cannot wait to find out.Finally, I will probably do some of the projects from Amy Butler's book, Little Stitches for Little Ones. Everything in this book looks so cute and I haven't used it at all in the few months that I've had it.
So, keeping checking back. I will be posting pictures of the finished products and reviews of the patterns I use.Wine Bag Tutorial
Wine Bottle Bag Tutorial

1. Intro
This tutorial will teach you how to make a wine bag with a lining. If you are short on time, you can always skip the lining. The bag will still look great without it. This bag makes a fun, unique, and reusable gift. Please note that this wine bag will fit an average bottle of wine. You may have to adjust the dimensions if you have an unusually sized bottle.
(a) A quarter yard of fabric for the outside of the bag and a quarter yard for the lining.
(c) Beads, buttons, sequins, or anything else you want to use to decorate your bag.


(i) take the bottom of the bag and place a mark on all four corning in ¼” in from each edge.
 (ii) you can pin the bottom of the bag to the rest the bag, if this will help you
 (c) Repeat step 4(a) and 4(b) using the lining fabric. Your finished lining should be sewn together exactly like your outside fabric.
 (e) Once inserted, using a ¼” seam allowance, sew the lining and outside fabric together at the top. However, MAKE SURE YOU LEAVE A 1½” OPENING. Pull the outside fabric through the opening and stuff the lining inside the bag.


 (f) Finally, edge stitch along the entire top of the bag to close the opening and to give the bag a nice finished look.

(b) In addition to using ribbon, you can decorate the bag using beads, sequins, buttons, or rick-rack. Be creative and have fun with it.
(c) Another idea is to use piping. Just attach the piping when you are sewing the bag together.
(b) Other sizes of bags. If you have a bigger wine bottle, just adjust the width of all of your pieces. Just make sure that you add the same amount to each piece so that they match up.
1. Intro
This tutorial will teach you how to make a wine bag with a lining. If you are short on time, you can always skip the lining. The bag will still look great without it. This bag makes a fun, unique, and reusable gift. Please note that this wine bag will fit an average bottle of wine. You may have to adjust the dimensions if you have an unusually sized bottle.
2. Materials
(a) A quarter yard of fabric for the outside of the bag and a quarter yard for the lining.
(b) Ribbon in a coordinating color.
(c) Beads, buttons, sequins, or anything else you want to use to decorate your bag.
3. Cutting the Fabric
From both your outside fabric and lining fabric, cut:
(i) Four 3.75” x 13” pieces
(ii) One 3.75” x 3.75” piece
(ii) One 3.75” x 3.75” piece
4. Sewing it Together
(a) Using a ¼” seam allowance, sew together the four larger pieces of your outside fabric. This should result in a square tube, which will be the sides of the bag.
(b) Then, sew the small square onto the bottom of the bag, again, using a ¼” seam allowance. To do this successfully, you will need to:
(i) take the bottom of the bag and place a mark on all four corning in ¼” in from each edge.
(ii) you can pin the bottom of the bag to the rest the bag, if this will help you(iii) with a 1/4” seam allowance sew from one mark across to the other on all four sides of the bag, making sure to not sure past these marks. Also, it is helpful to sew the two horizontal sides first and then sew the two vertical lines (i.e. sew two parallel sides, then sew the other two parallel sides).
(c) Repeat step 4(a) and 4(b) using the lining fabric. Your finished lining should be sewn together exactly like your outside fabric.(d) To attach the lining you will take the outside of the bag and turn it so that it the right side is facing out (so the seams are inside) and you will keep your lining fabric wrong side out. Then you will take the outside fabric and insert it into the lining.
(e) Once inserted, using a ¼” seam allowance, sew the lining and outside fabric together at the top. However, MAKE SURE YOU LEAVE A 1½” OPENING. Pull the outside fabric through the opening and stuff the lining inside the bag. (f) Finally, edge stitch along the entire top of the bag to close the opening and to give the bag a nice finished look.5. Decorating (the REALLY fun part)
(a) This is where you can do whatever you want with your bag. As you can see in the picture below, on our bags we just tied some ribbon around the bag to close it. On one bottle, we put some coordinating glass beads on the ribbon to add some interest.
(b) In addition to using ribbon, you can decorate the bag using beads, sequins, buttons, or rick-rack. Be creative and have fun with it.
(c) Another idea is to use piping. Just attach the piping when you are sewing the bag together.
6. Other Options
(a) A tote bag with handles. If you want to make a wine tote with handles, in addition to cutting the outside and lining fabric, cut the same size pieces of heavy duty lining and sew them along with the outside of the bag. This will make your sturdy. Then, using the outside fabric, make a handle. The handle can be sewn in between the lining and the outside of the bag when you are edge stitching your bag. Just make sure that, when you are attaching the lignin to the bag that you leave openings for the handles.
(b) Other sizes of bags. If you have a bigger wine bottle, just adjust the width of all of your pieces. Just make sure that you add the same amount to each piece so that they match up.
Wednesday, November 18, 2009


Finished my Quilt

I finished my Advent Calendar Quilt in more than enough time. This was my first attempt at free motion quilting. Boy, it was difficult. Some of my stitching is uneven, but you can't really tell unless you are really close. I'm sure I will get better with some practice though.
Tuesday, November 17, 2009
Wine Bottle Bags
My mom and I have been working on making wine bottle bags. I plan on posting some pics and a tutorial soon. Has anyone ever tried making these? Do you have any tips, tricks, or pics? Does anyone know of any free patterns on the internet? Thanks for your help.
Wednesday, November 11, 2009
Advent Calendar Quilt
I found this great tutorial for an advent calendar quilt. Click Here . Below is a picture of it from the website. I am working on mine now and am rushing to get it done by December 1. Let's hope I am able to do so!

The fabric is available from several sources:
Fat Quarter Shop
Dillinger Fabrics
Etsy
Be Sew Happy
You better start now if you are going to make this in time!
The fabric is available from several sources:
Fat Quarter Shop
Dillinger Fabrics
Etsy
Be Sew Happy
You better start now if you are going to make this in time!
Frame Purse Tutorial Part II
Frame Purse Tutorial (Part II)
By:
Samantha Sheppard*
1. Sewing the Purse
DO NOT SEW IN THE LINING FABRIC AT THIS POINT. THE LINING WILL BE ADDED LATER.
(a) Now, you will sew everything together. Place the right side of the outside fabric together and put the sew-in interfacing on the outsides. Sew the bag together starting at one of the hinge markings and finishing at the other hinge marking. Next, take the corner of your bag and flattenit. This will form a triangle. Make a measurement from the tip of the triangle. The length of this measurement will depend on how wide you want the bottom of you bag to be. Mark this measurement and sew along the marked line and trim seam. Do this on this other side of the bag. Sew the lining of the bag using these same methods. However, leave a large opening in the bottom of the lining. The opening will be used to pull the outside of the bag through once the outside and the lining are sewn together.


(b) Place the outside of the bag inside the lining so that the right sides of both bags are facing each other. Sew the outside of the purse to the lining at the top on each side. Then pull the outside of the purse right side out through the little opening that you left in the bottom of the lining. Then sew up the opening in the lining.

(c) Tuck the lining into the bag and iron as needed.

2. Gluing the Frame to the Purse
(a) This part can be a bit tricky. You want to use enough glue so that the frame will stay in place, but you don’t want to use so much that it squeezes out of the frame and gets all over your fabric (and you can’t get it off).


(c) Wait another 30 minutes and clean up any glue that got on your frame by gently scratching it with something (my finger nails work great).
(d) Let the purse dry overnight before using it.
Now you are done. Enjoy your purse!
* For questions and comments, contact me at KassiOh1@gmail.com.
By:
Samantha Sheppard*
1. Sewing the Purse
DO NOT SEW IN THE LINING FABRIC AT THIS POINT. THE LINING WILL BE ADDED LATER.
(a) Now, you will sew everything together. Place the right side of the outside fabric together and put the sew-in interfacing on the outsides. Sew the bag together starting at one of the hinge markings and finishing at the other hinge marking. Next, take the corner of your bag and flattenit. This will form a triangle. Make a measurement from the tip of the triangle. The length of this measurement will depend on how wide you want the bottom of you bag to be. Mark this measurement and sew along the marked line and trim seam. Do this on this other side of the bag. Sew the lining of the bag using these same methods. However, leave a large opening in the bottom of the lining. The opening will be used to pull the outside of the bag through once the outside and the lining are sewn together.
(b) Place the outside of the bag inside the lining so that the right sides of both bags are facing each other. Sew the outside of the purse to the lining at the top on each side. Then pull the outside of the purse right side out through the little opening that you left in the bottom of the lining. Then sew up the opening in the lining.
(c) Tuck the lining into the bag and iron as needed.
2. Gluing the Frame to the Purse
(a) This part can be a bit tricky. You want to use enough glue so that the frame will stay in place, but you don’t want to use so much that it squeezes out of the frame and gets all over your fabric (and you can’t get it off).
(b) Start by filling one side of the frame with a continuous line of glue. Then, starting with the edges, place the purse into the frame. You will want to use something like scissors or a letter opener to gently push the purse into the frame. Let the glue dry for at least 30 minutes before attempting to repeat this step on the other side of the purse.
(c) Wait another 30 minutes and clean up any glue that got on your frame by gently scratching it with something (my finger nails work great).
(d) Let the purse dry overnight before using it.
Now you are done. Enjoy your purse!
* For questions and comments, contact me at KassiOh1@gmail.com.
Frame Purse Tutorial Part I
Frame Purse Tutorial (Part I)
By:
Samantha Sheppard
By:
Samantha Sheppard

1. Introduction
This tutorial will show you how to make a frame purse. You typically cannot buy patterns for frame purses because there are so many different frames available and it would be difficult to find a pattern that actually fit your frame. Thus, in order to make a frame purse, you must make your own pattern (which is actually pretty easy). This tutorial will cover the following:
(a) Where to purchase frames.
(b) Fabric selection.
(c) How to construct a pattern for your frame.
(d) Sewing the purse and attaching it to the frame.
2. Materials
(a) Paper for your pattern.
(b) Pencil or sharpie pen.
(c) Frame.
(d) ½ yard of fabric for the outside of the purse.
(e) ½ yard of fabric for the lining of the purse.
(f) ½ yard of strong sew-in interfacing.
(g) Strong fabric glue.
(h) Coordinating thread.
3. Where to Purchase Frames.
Unfortunately, I have not found any of these purse frames at my local fabric stores. However, frames can be purchased online at several locations:
(a) http://www.u-handbag.com/index.php?main_page=index&cPath=14
(b) http://stores.mikkiehk.com/StoreFront.bok (this is where I purchased mine – great selection and price!)
(c) http://www.tallpoppycraft.com/catalog/index.php?cPath=32
4. Fabric Selection
The fabric for the outside of your frame purse can be almost any type. You can even choose a more thin or flimsy fabric because we will be using interfacing to make the bag stronger.
5. Making the Pattern
(a) Take a piece of paper and lay your frame in the middle. Outline the outside (not the inside) of the frame. Make marks at the bottom of the hinges.

(b) Next, draw the pattern around the frame. This is where you can get creative. I chose to make a smaller, squarish bag, but if you want a more rounded and puffy bag, you can draft your pattern this way. Also, I included a ½ inch seam allowance. Keep that in mind when drafting your pattern.

(c) You now have to mark on your patter where the hinges will go. This is really important. If you get this part wrong your frame will not fit on your bag properly. Put the top corner of your purse frame onto the top corner of your pattern so that you have lined it up with the sides of your pattern. Then measure ½ inch (or whatever seam allowance you have chosen) from the frame hinge. Now you can cut your pattern out.

(d) Using the pattern that you just drafted, you will cut 2 pieces of:
(i) The outside fabric.
(ii) The lining fabric.
(iii) The fusible interfacing (iron this onto the wrong side of the outside fabric).
(iv) The heavy sew-in interfacing.
Subscribe to:
Posts (Atom)